How to build an HTML5 game’s controller with Arduino, NodeJS and socket.io — Part 2
April 25, 2020
In the previous post I talked about the purpose of the project (Make an HTML5 game controlled by “external controller”), the final product (An Arduino controller) and showed the first step (“control it from a different browser window using the same keyboard keys”) If you’re interested in the server code, you should check it because we’re basically done with it. (Maybe we’ll add a bit server code in this post but it will relay on the existing mechanizm)"
In this post, we gonna talk about the second step — “control it from a mobile phone on the same network of course.”
To make things more interesting, I wanted to make the controller more “real” — means not just regular buttons for moving right and left but using a virtual “joystick”.
 from [Pixabay](https://pixabay.com/?utm_source=link-attribution&utm_medium=referral&utm_campaign=image&utm_content=2905361) — joystick, but real](/static/ccb40a79e528fd8c96b98c029ecc6201/0f98f/1gGU1WZtUfIo8JxEZxgXrKQ.jpg "Image by [Martinelle](https://pixabay.com/users/Martinelle-495565/?utm_source=link-attribution&utm_medium=referral&utm_campaign=image&utm_content=2905361) from [Pixabay](https://pixabay.com/?utm_source=link-attribution&utm_medium=referral&utm_campaign=image&utm_content=2905361) — joystick, but real") Image by Martinelle from Pixabay — joystick, but real
Image by Martinelle from Pixabay — joystick, but real
Like any developer (I hope) I don’t like to write a code if I have the option no to (It’s a paradox, I know). So I found a great library for a virtual joystick with very advanced features — nippleJS.
For my purpose, I don’t need all those advanced features but only need to know if the user want to move right or left. The fire button will be a different button with a similar look and feel.
The initialization code is
1var options = {2 zone: document.querySelector('.zone'),3 mode: 'static',4 position: {left: '50%', top: '50%'},5 color: 'red',6 lockX: true,7};8const manager = nipplejs.create(options);zone— the DOM element which the joystick will rendered inmode: ‘static'— otherwise the joystick will showed where the user will touch on the screen. I want it to be static for simplicity experienceposition— basically centercolor— duhlockX: true— I need only to allow only right to left — x-axisץ
The result
Now, I need to trigger the key handlers in the game host through the socket. (Seriously, if you haven’t read the first post, now is a good time)
1const KEY_CODES = { left: 37, right: 39, fire: 32 };2let lastDirection;3
4function emit(type, keyCode) {5  socket.emit('event', {type, keyCode})6}7
8manager.on('dir end', (_, info) => {9  // user ended the interaction or change the direction10  if (!info.direction || info.direction.x !== lastDirection) {11    emit('keyup', KEY_CODES[lastDirection]);12  }13  // "Optional chaining" is so cool (unless you read it in after 2022, so it's obvious now)14  lastDirection = info.direction?.x;15  if (lastDirection) {16    emit('keydown', KEY_CODES[lastDirection]);17  }18});
I need to store the lastDirection in case the user will push the stick to one side and then to other side without stop in order to trigger the first side keyup. Only then I can trigger the current side keydown.
The fire button
The logic is similar — to emit the fire keys events on touches handlers
1const fireButton = document.querySelector('.fire');2fireButton.addEventListener('touchstart', () => emit('keyup', KEY_CODES.fire));3fireButton.addEventListener('touchend', () => emit('keydown', KEY_CODES.fire));And because I want the fire button to has the same look and feel as the joystick:
1.fire {2  position: absolute;3  bottom: 50px;4  left: 50px;5  width: 100px;6  height: 100px;7  display: flex;8  align-items: center;9  justify-content: center;10  opacity: 0.5;11  border-radius: 100%;12  border: 0;13  background: none;14  outline: 0;15  transition: opacity .3s ease;16}17
18.fire:before,19.fire:after {20  content: "";21  display: block;22  width: 50px;23  height: 50px;24  background: red;25  opacity: 0.5;26  border-radius: 50%;27  position: absolute;28}29
30.fire:after {31  width: 100%;32  height: 100%;33}34
35.fire:active {36  opacity: 1;37}
The server
The last thing I need to do in order to allow both of the clients to communicate is to expose the server to the local network because currently it’s running only in my local machine (localhost).
For that, I’m using a great library (and utility) — serve-handler “The foundation of serve”.
1+const handler = require('serve-handler');2 const express = require('express');3 const app = express();4-const http = require('http').createServer(app);5+const http = require('http').createServer((request, response) => handler(request, response));But what’s the URL of the game host? localhost is only working on the same machine.
The address is the local network IP. To make it easier, the server will log the full address.
1http.listen(3000, () => {2  console.log(`listening on ${getIPAddress()}:3000`);3});4
5function getIPAddress() {6  const interfaces = require('os').networkInterfaces();7  for (const devName in interfaces) {8    const iface = interfaces[devName];9
10for (let i = 0; i < iface.length; i++) {11      const alias = iface[i];12      if (alias.family === 'IPv4' && alias.address !== '127.0.0.1' && !alias.internal)13        return alias.address;14    }15  }16
17  return '0.0.0.0';18}
Thanks to https://stackoverflow.com/a/15075395/863110
When I reached that point, everything is working but.. not as expected. The problem is, when the user push the stick to the one side and then start to moving to the other side, the stick hasn’t reached the center so, technically, it’s still in the right. But the user want the mothership to go to the left. Although after a moment it will go to the left, the experience is not perfect.
This joystick’s behaviour is makes sense when combining the direction with force and distance. When the gamer has the ability to control the speed of the character, those options come into account. In the case I described a moment ago, the character doesn’t need to go left in the first left movement but it should slows down the character. Only when the joystick reached the center the character should start moving left.
I started to think to get rid of the lovely joystick. Maybe it’s too advanced for my needs.
After few days, I ended up with a brand new Web Component (which was an adventure on its own). But.. sadly, it’s not solves the problem entirely.
I decided that it’s good enough. After all I want to focus on the Arduino part and less on the web “controller”.
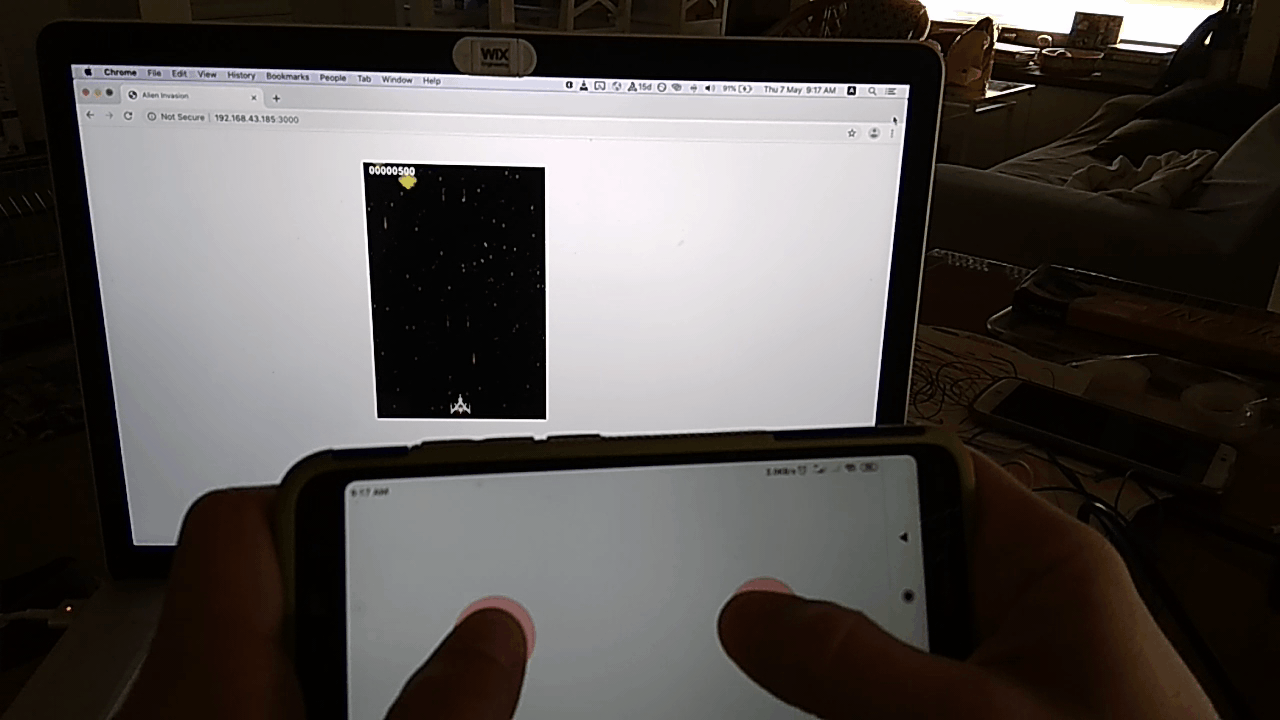 Me, playing the game with my phone
Thank you for reading. As usual, comments and questions are very welcome.
The post is basically comes to its end. But if you want a basic explanation about the joystick, stay here.
In few words, Web Components is a very nice concept which allows to create pure vanila html elements. If you’re familiar with any of the common components libraries (such as React, Angular, Vue etc.) this concept should sounds very familiar (props, event, lifecycle).
The element I made — jjoystick (javascript joystick — joystick was taken in npm) built on top of input[type=range] . Left = 1, center = 2, right = 3. It’s nice because the functionality of moving the “stick” already implemented by the browser and using css, the style can be customized so it will look like.. well.. joystick.
There are some parts when it comes to web components
- Modify the DOM — add elements. In this case, the
input. For example:
1const input = document.createElement('input');2input.type = 'range';3input.min = '0';4input.max = '2';5input.value = '1';6wrapper.appendChild(input)7this.shadowRoot.appendChild(wrapper);- Style the elements — add
styletag with the relevant css. The interesting part is that there is no need “namespace” the selectors because of the “shadow DOM”. For example:
1const style = document.createElement('style');2style.textContent = `3 /*css*/4 .wrapper {5 display: inline-block;6 width: 100px;7 height: 100px;8 background: rgba(255, 0, 0, 0.3);9 border-radius: 50%;10 display: flex;11 align-items: center;12 justify-content: center;13 }14 /*!css*/15`;16this.shadowRoot.appendChild(style);(You might wonder about the /*css*/ annotations. It’s because textContent is a string but I like syntax highlight).
- Bind events — so the consumer could listen to it. For example:
1this.element.addEventListener('input', e => {2 const {value} = e.target;3 const side = this.states[value];4 this.dispatchEvent(new CustomEvent('dir', {5 detail: side6 }));7});So the consumer can listen to dir
1joystick.addEventListener('dir', ({detail}) => console.log(detail) /* right, left */);You’re more than welcome to check the source code or npm it.
This is the end of the post. For real 😁
Original Post